Meal Prep Hacks for the Holidays
Oct 29, 2021, Updated Nov 01, 2023
This post may contain affiliate links. Please read our disclosure policy.
The holidays approach, and with them comes a flurry of activity in the kitchen! If you’re like us, then preparing delicious meals might be part of your traditions during the holiday season. But prepping and cooking all of those dishes for all of those loved ones can come with some seasonal stress! With some expert help from Market Wagon, we’ve put together this list of meal prep hacks that will give you more time for joy this holiday season.
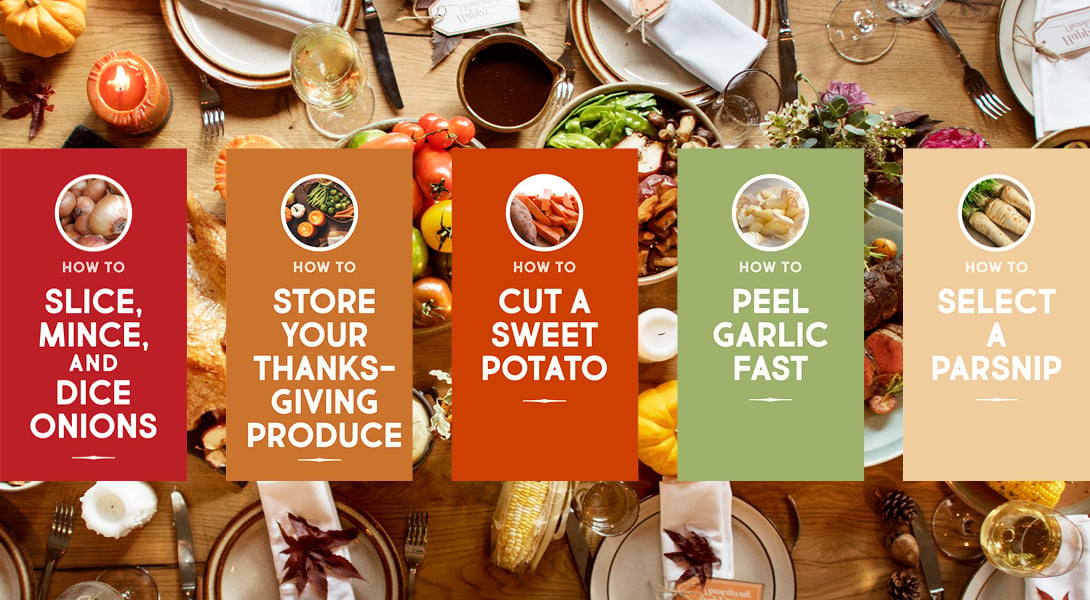
Slicing, Dicing, and Mincing Onions
The holidays aren’t the time for tears, so wouldn’t it be great to find a way to cut onions that didn’t involve them? Fortunately, there’s an easy meal prep hack for doing so! Onions contain sulphuric compounds, which is what causes your eyes to well up when you cut them. So start cutting your onions by neutralizing and removing those sulphuric compounds.
First, freeze the onion for 20 minutes prior to cutting. They should become extra cold but not completely frozen. Leaving the root intact, chop off the top of the onion and peel off the outer layers. These parts contain most of the sulphuric compounds, so by cutting them off first you’ll make chopping the rest of the onion easier.
Different recipes called for different onion cuts. So how do you need to cut yours? Slice the onion crosswise about 1/4 for rings, which are great for sandwiches. If you want crescents, chop the onion lengthwise. These are perfect for soups and are easy to slice down into smaller sizes for many other dishes.

To mince an onion, chop off the top, slice the onion in half lengthwise, and peel it. Laying the onion on the flat side, make lengthwise cuts as close together as possible while avoiding the root. Then turn the onion 90 degrees and repeat, making crosswise slices as close together as you can. Throw away the root when you’re done.

To dice an onion, follow a similar process. Cut off the top, slice it in half lengthwise, and peel it. Set the onion on the flat side and make several lengthwise cuts, again avoiding the root. Choose the size of pieces you want by making larger or smaller cuts. Next, cut the onion in half horizontally and start slicing it crosswise. When you’re done, throw the root away.

Cutting Sweet Potatoes
Sweet potatoes are perfect for cool weather and cheery holidays. They add some nutritious sweetness to any meal! We have some meal prep hacks to help you more easily enjoy these sweet spuds during the holiday season.
There are two easy ways to cut sweet potatoes. If you’re making fries, cut them into wedges. Most other dishes are better suited to diced sweet potatoes. No matter which you choose, start with a sharp knife and a large cutting board. Here’s how you can master these two cuts:

To cut sweet potatoes wedges, start by rinsing and lightly scrubbing them to remove dirt before peeling the potatoes. Slice off a small portion of the potato to create a flat surface so your potato sits steadily on your cutting board. Next, cut lengthwise through the potato to create rounds. Cut each round twice lengthwise to make wedges.
To dice sweet potatoes, again start by rinsing, lightly scrubbing, and peeling the potatoes. Slice a small piece off to create a flat portion where the potato can steadily rest on the cutting board. Cut lengthwise through the potato to create rounds. Next, cut each round twice lengthwise, then turn it 90 degrees and cut several times to create even cubes.

Whether you’re cutting wedges or dicing your potatoes, try to cut each wedge to a similar size so they cook evenly. When you’re done cutting, rinse the sweet potato flesh in cool water to help prevent it from browning.
Painlessly Peeling Garlic
Garlic is a delicious addition to dishes any time of year, but it’s perfect for adding some flavor to your favorite holiday meals. While fresh garlic can elevate a meal, peeling it can be a pain. Put an end to your garlic troubles with our meal prep hacks for quickly peeling garlic.

Start by choosing good garlic. Buy it loose when possible so you can choose the healthiest heads. Each bulb should be plump and compact with a taught, unbroken skin. They should be firm throughout with no damp or soft spots and heavy for their size. Avoid any with visible green shoots.
To peel the garlic, start by separating the cloves from the root. This is easy enough to do by firmly pressing the garlic bulb against a counter using the palm of your hand. The cloves should pop off the root.
Now place the cloves in a hard-sided container, like a mason jar or a bowl with a lid. You could even press two bowls or a plate and a bowl together if it creates a good enough seal. What’s important is that the garlic has enough room to bounce around and won’t fly out when shaken vigorously.
Next, do just that! Shake the cloves with gusto for 20 to 30 seconds. This should loosen and remove the garlic peel. If most of it is still attached, just shake it for a bit longer. When you’re done, remove and throw away the garlic peels. Any that are still attached should come off easily.

Selecting Parsnips
Parsnips may be a bit more rare than some veggies around your kitchen, but the holidays are a great time to experiment with them and add them to dishes. They’ve been a part of traditional holiday dishes for years, so why not give them a shot?

To select parsnips at your grocery store, start by looking for ones that are small to medium in size. Larger parsnips can develop a woody, bitter core, so try to avoid those. Pick even-colored parsnips that are firm and free of soft or dark spots, which can indicate decay. Parsnips don’t always come with the tops still attached but if the ones in your store do, look for tops that are a fresh, healthy green without signs of wilting.
Picking them up ahead of time? Perfect! Fresh parsnips will keep in the refrigerator for two to three weeks. Remove the tops before you store them this way to help them retain moisture.

Storing Thanksgiving Leftovers
If you find yourself with lots of leftovers after your Thanksgiving feast, you’re doing it right! There are all kinds of tasty dishes you can make using leftover Thanksgiving favorites, but how do you keep them fresh in your fridge? Here’s a quick guide to storing some common Thanksgiving produce:

Potatoes
Potatoes can keep for a surprisingly long time in a cool, dry, dark location like a pantry or cellar. They tend to keep better if they’re as fresh from the ground as possible. Don’t store fresh taters in the fridge, as it can ruin their flavor and texture.
Similarly, avoid storing them alongside onions, as the gas released by onions can cause potatoes to sprout. Check your potatoes regularly and remove any sprouting potatoes, as they can cause each other to sprout more quickly. Avoid eating any green or sprouting part of the potato: it’s toxic to humans!


Onions
Store white onions in a cool, dry, dark place. If they’re still whole, leave the skin on and store them somewhere with ventilation – and avoid plastic bags! If they’re cut, store them in an air-tight container in the fridge.

Garlic
A whole garlic bulb can stay fresh for about six months. The more protective layers you remove, the shorter its shelf life becomes. An individual unpeeled clove will last around three weeks, while peeled garlic will only last up to a week. If you chop or mince your garlic, use it within a day.
Garlic will keep well in a bowl, basket, or paper or mesh bag on the counter. But for best results, keep it somewhere cool, dry, and dark with some air flow (like a pantry) and don’t seal it in a plastic bag.


Cranberries
Got some leftover cranberry sauce? Save it for Christmas or another special meal as the year ends. Homemade and canned whole berry cranberry sauce can keep in the freezer for about 3 months. However, jellied cranberry sauce doesn’t do well in the freezer, as its texture changes to become more watery.

Celery
If you don’t use all of your celery, don’t sweat it. This crunchy veggie can easily be stored for later. If it came pre-packaged, put it back in the packaging and store it in a warmer, more humid part of the fridge. It will keep there for about one or two weeks.
If it didn’t come with any packaging, separate and wash the stalks and let them sit out to dry. Cut about ¼ inch off the top and bottom of each stolk, then loosely wrap them all together in a dry paper towel. Wrap the lightly in aluminum foil or place them in an unsealed plastic bag that gives them room to breathe. Celery stored this way can last about four weeks. You can also freeze it for over a year by blanching it first.

Apples
Your refrigerator is the perfect place to store leftover apples. They especially love the crisper drawer! However, they’ll last on the counter, too. To keep them fresh as long as possible, keep them humid. The best way to do that is to store them in a plastic bag with holes punched in it. Some apples come pre-packaged in bags like these, but if you don’t have one handy you can just cover them with a damp paper towel.
Apple slices will keep for about three to five days, especially if you toss them in some lemon juice before storing them to help prevent browning. Both whole and sliced apples can also be frozen. Be warned, though, that freezing apples changes their texture. When they come out of the freezer, their best use is in cooking.

What Are Your Holiday Meal Prep Hacks?
Every family has some favorite holiday meals, which means every family also has some secret meal prep hacks! What does your family love to eat around the holidays? Do you have any special ways to make cooking those meals easier or storing the leftovers simpler? Share them with us in the comments!